Fedora is an open-source Linux distribution developed by the Fedora Project. The main focus of the Fedora project is to develop a stable Linux distribution in the long run.
After only being available in beta, Fedora 37 is now widely available. The stable version was released a few weeks ago, or on November 26, 2022, to be exact.
This version brings some new updates and improvements, especially to the desktop and sysadmin environments.
The Fedora 37 is also introducing two new editions, namely Fedora CoreOS and Fedora Cloud. Which are focused on container-based workspace and Cloud deployments.
But, in this tutorial, we will be focusing on how to install Fedora 37 Workstation. I will guide you step-by-step through every process. By the end of this tutorial, you should be able to install Fedora 37 on your own computer.
Fedora 37 Key Features
Being the latest release of the Fedora distribution, the Fedora 37 workstation brings some new updates and improvements, which will give a better experience for Fedora users. Some of those features are:
- The beautiful of gnome 43
With gnome 43, Your Desktop will be more elegant and rich in features.
The dark mode is now easily accessible from the quick menu.
The screenshot button is also now available from the quick menu. - Shipped with Kernel 6.0
Comes with the newest Linux Kernel, which means that Fedora 37 will have the latest security patch and more hardware support. - Official Support for Raspberry Pi
Fedora 37 gives official support for Raspberry Pi, even though it is only available in a 64-bit version.
System requirements
To install Fedora 37 on your machine, your computer needs to have system specifications at least equal to or higher than the specifications below:
- 2GHz quad core processor
- 2GB System Memory or more
- 20GB drive space available
- Display card capable of 800×600 or higher
Fedora 37 Installation
Without further ado, let’s get started and install the Fedora 37 workstation on your computer.
Download the Fedora 37 ISO file
First, you will need to get the Fedora 37 workstation ISO file in order to make a bootable USB drive. which is what we will do in the second step.
To download the Fedora 37 ISO file, head to the Fedora official download page.

Choose the Fedora 37: x86_64 Live ISO to download the ISO image.
Just wait until the download is finished, then you can continue to the next step.
Prepare the Bootable USB Drive

Now that you already have the ISO file, we can proceed to create a bootable USB drive.
In this step, we will be creating a bootable USB drive using software called BalenaEtcher. With BalenaEtcher, creating a bootable USB will be much easier. You can get BalenaEtcher from the BalenaEtcher official website, which is available for Windows, macOS, and Linux.
Open the BalenaEtcher app from your application menu.
Then, there will be only three simple steps.
Select image
Choose flash from file option, then choose the Fedora 37 Workstation ISO file.
Select target
Now click the Select target button. There will be a prompt to choose the USB drive you want to flash. Choose your USB drive and click Select.
Flash!
Finally, click the Flash! button to start flashing the ISO file into the USB stick. It will take a few minutes to flash. Just chill and wait for the flashing process to finish. Once it’s finished, it will notify you that your bootable USB is ready to use.
Boot into the Bootable USB Drive
- Plug your bootable USB into the computer
- Turn on your computer(or restart if it is already turned on)
- Immediately press the F2 button on your keyboard(depends on the manufacturers, it can be F1, F8 or F10)
- Your computer will boot into the bios settings, you can navigate using the arrow buttons or you can use the mouse too if it is supported by the bios.
- Change the boot order to make your bootable USB in the first order.
- Save the bios configuration and restart the computer.
Now it should be booting into the Fedora live USB.

You will be prompted with 2 options, Try Fedora and Install to Hard Drive. Choose the second one.
Choose Language
Here, you can choose the language you want to use during the installation process of Fedora 37.

Keyboard Layout
The next step is to choose the keyboard layout. Here we will choose the default one, which is English. You can choose other languages too like Chinese, Japanese, or any other language.

Time Zone
Set a proper timezone for your computer based on your actual location.

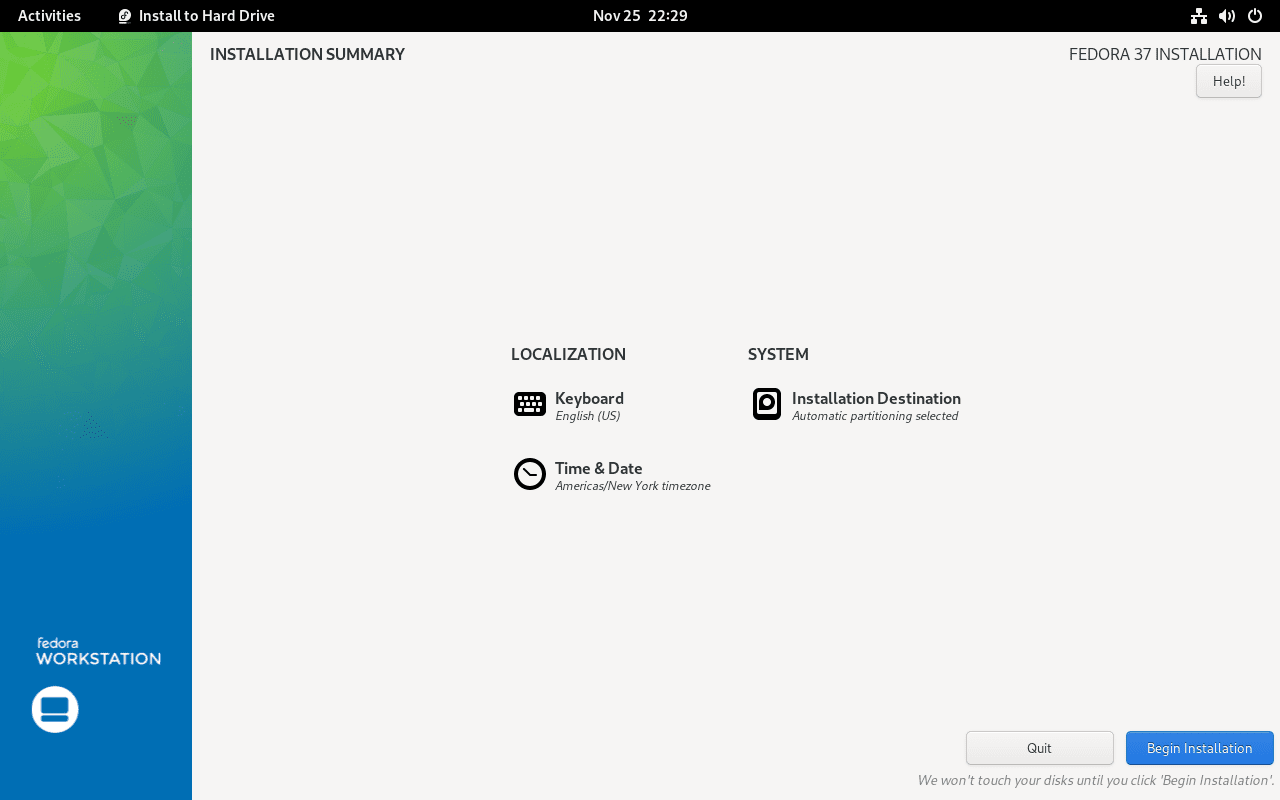
Drive Partition
For the drive partition, we will use the automatic configuration setup.
First, choose the drive that the Fedora 37 will be installed into.
In the Storage Configuration menu, choose the Automatic option.
Finally hit the done button at the top left corner.

Begin the Installation Process
After successfully configuring Language, keyboard layout, time zone, and drive partition. Now we can begin to install the Fedora 37 workstation into the drive.
Start the installation process by clicking the Begin Installation button.
The installation process should be already begun. Just wait for it, it might take a few minutes, depending on the speed of the hard drive. If you are using SSD, it would be faster. But if you are using a hard disk, it may take a little bit more time.

Once the installation is done, click the Finish Installation button at the bottom right corner.
Reboot the Machine
Now that the Fedora 37 workstation is already installed on your hard drive, you need to reboot from the fedora live image.
To reboot from the Fedora live image, click the power button at the top right corner, then click the power icon, and choose restart.

Once the computer is off, unplug the bootable USB from the computer, then turn on the computer again.
Now it should be booting up into the Fedora 37 from your hard drive.
The process is not completed yet, you still need to follow a few more steps below.
Enable Third Party Repositories
Enabling third-party repositories is not optional. But, by enabling third-party repositories you will get more options to install packages and proprietary software.

So I recommend you enable the third-party repositories. To do so, simply click the Enable Third-Pary Repositories button.
Create a User and Password
Next is to create a user and password. This is a necessary step because you can’t operate the Fedora desktop without a user account.

Fill the Full Name column with your name. and fill the Username column with whatever username you like. But remember, you can’t have a space in the username.

Then, the password. Create a password that’s strong and easy for you to remember.
Confirm the password by typing it in the second column.
Once you have done creating the password, click the Next button.
Installation Complete

All the setups have been done. which means that the installation of the Fedora 37 workstation is successfully completed. Click the Start Using Fedora Linux button to start exploring the Fedora 37 workstation.
Conclusion
Fedora 37 workstation is the latest release of the Fedora Linux distribution. Bringing some latest software updates including gnome 43 and Linux kernel 6.0, Fedora 37 is a distro that you must give a try.
In this tutorial, we have learned about how to install Fedora 37 workstation. I know it’s a long tutorial, but it should be easy to follow. I hope you enjoy the tutorial.